
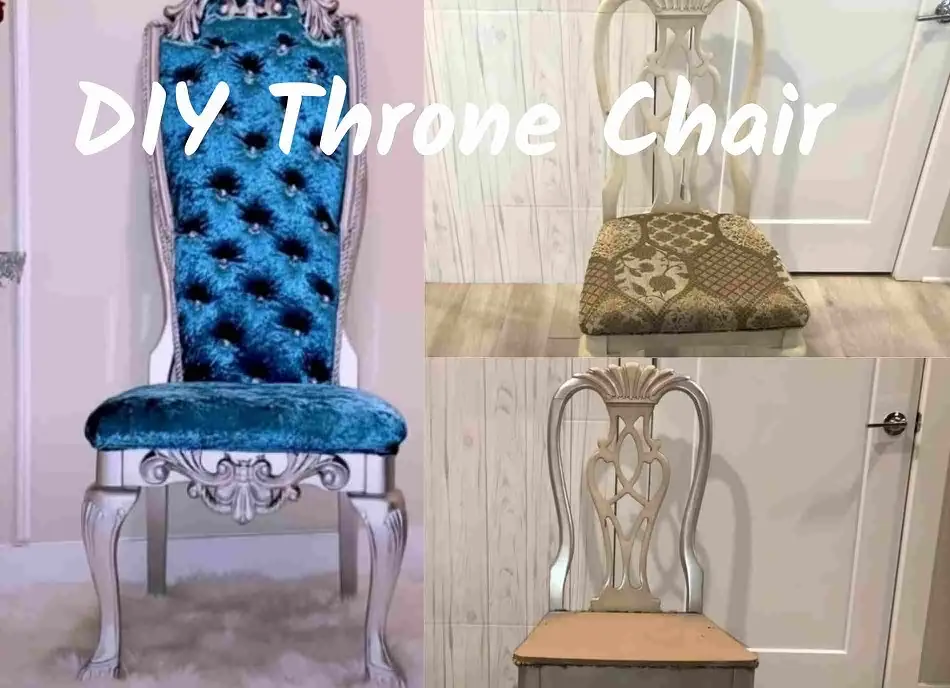
Have you ever dreamed of sitting on a majestic throne, feeling like royalty in your home? Look no further! This guide will unveil the secrets of creating your DIY throne chair. Whether you want to add an extravagant statement piece to your living room or create a captivating photo prop, this project will make your royal aspirations come true. Get ready to immerse yourself in the world of creativity and craftsmanship as we embark on this regal journey.
Table of Contents
- Unleashing Your Inner King or Queen:
- Additional Inspiration for Your DIY Throne Chair:
- FAQs (Frequently Asked Questions):
- Q: Is this project suitable for beginners?
- Q: Where can I find the materials required for this project?
- Q: Can I customize the size and shape of the throne chair?
- Q: How long does it take to complete the DIY throne chair?
- Q: Can I incorporate additional features into my DIY throne chair?
- Q: Can I use alternative materials instead of wood for the base?
- Q: Are there any safety considerations when building a DIY throne chair?
- Conclusion:
Unleashing Your Inner King or Queen:
1. Gathering Your Materials:
To begin this DIY adventure, you’ll need the following materials:
- A sturdy wooden chair as the base
- High-quality fabric or upholstery
- Foam padding for added comfort
- Decorative trimmings and embellishments
- Wood glue, screws, and a screwdriver
- A staple gun and staples
- Paint or stain for a royal finish
- Optional: faux fur or velvet for a luxurious touch
2. Designing Your Throne Chair:
Let your imagination run wild as you envision the design of your throne chair. Will it have elegant curves, ornate carvings, or a modern twist? Sketch your ideas or create a digital design to guide you through the process. Remember, your throne chair should reflect your unique style and personality, so don’t hesitate to get creative!
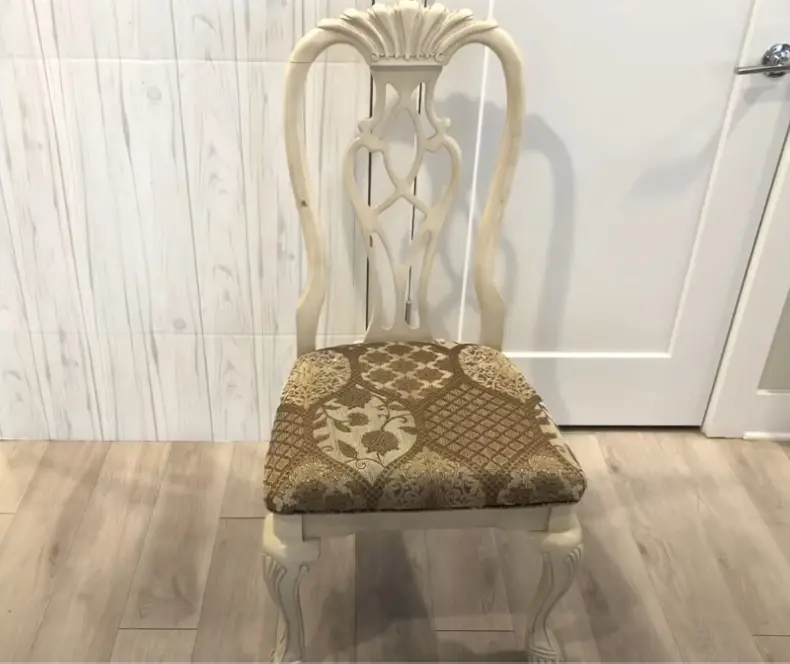
3. Preparing the Base:

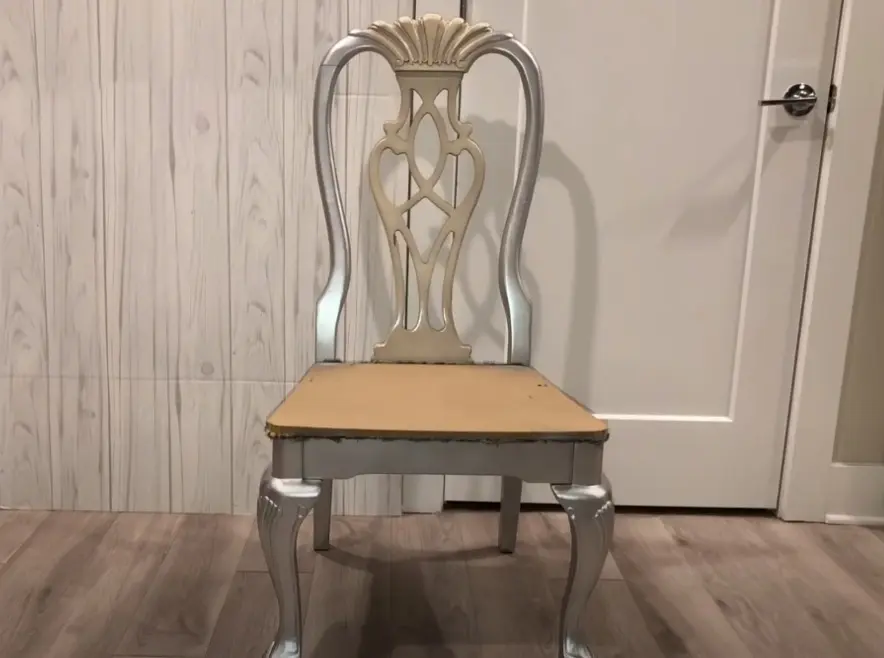
Start by disassembling your wooden chair and removing any unnecessary parts. Ensure that the remaining structure is sturdy and stable. Sand down any rough edges and apply a coat of paint or stain to achieve your desired royal aesthetic. Allow it to dry thoroughly before moving on to the next step.
4. Adding Comfort and Elegance:
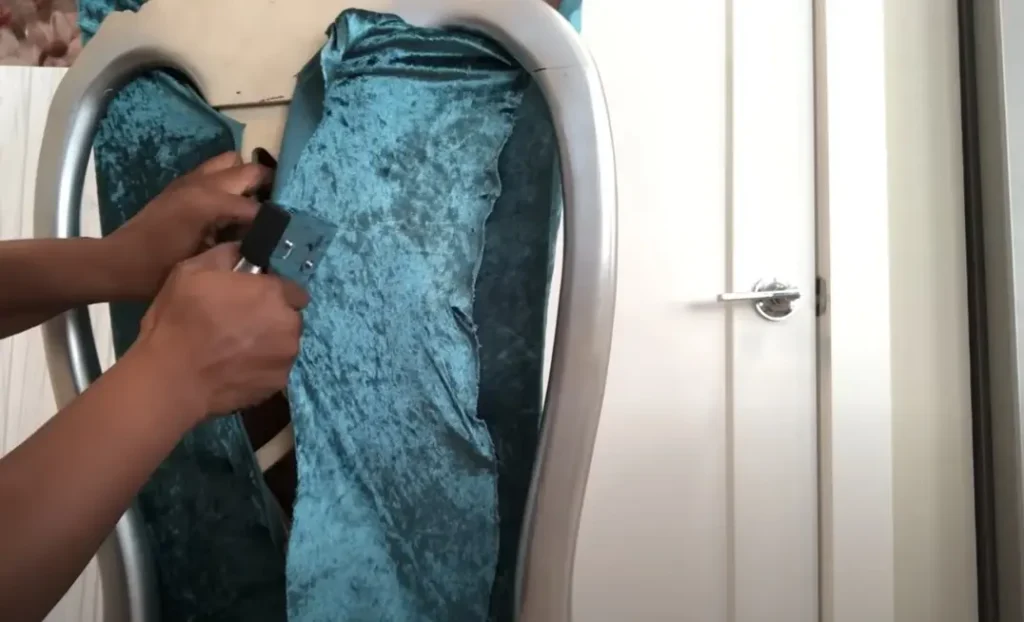
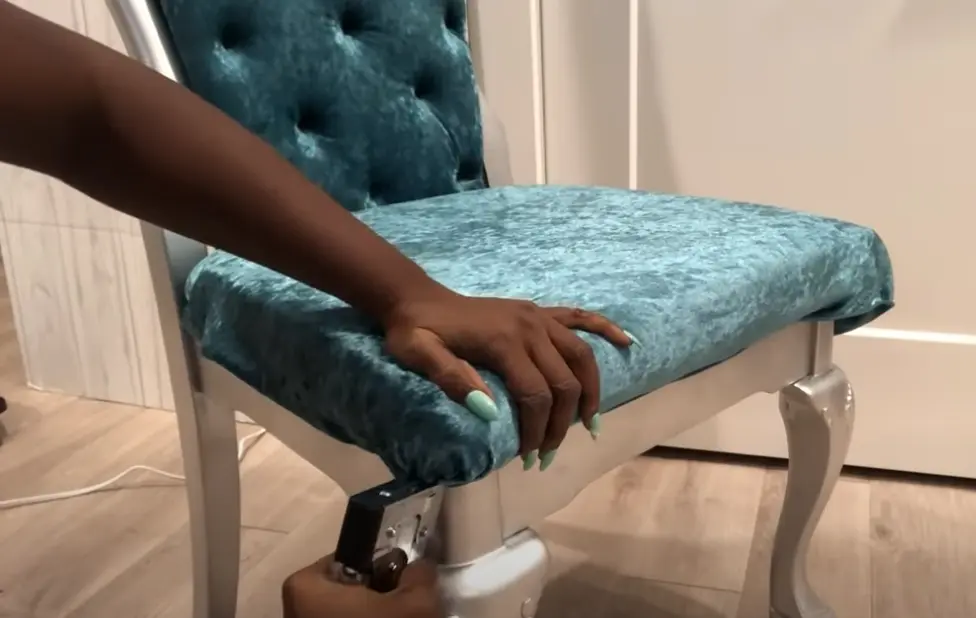
Place the foam padding on the seat and backrest of your chair, cutting it to fit perfectly. Secure it in place using a staple gun, ensuring a plush and comfortable seating experience fit for a monarch. Next, carefully drape your chosen fabric or upholstery over the padding, smoothing it out and fastening it securely underneath with staples.
5. Customizing Your Throne:
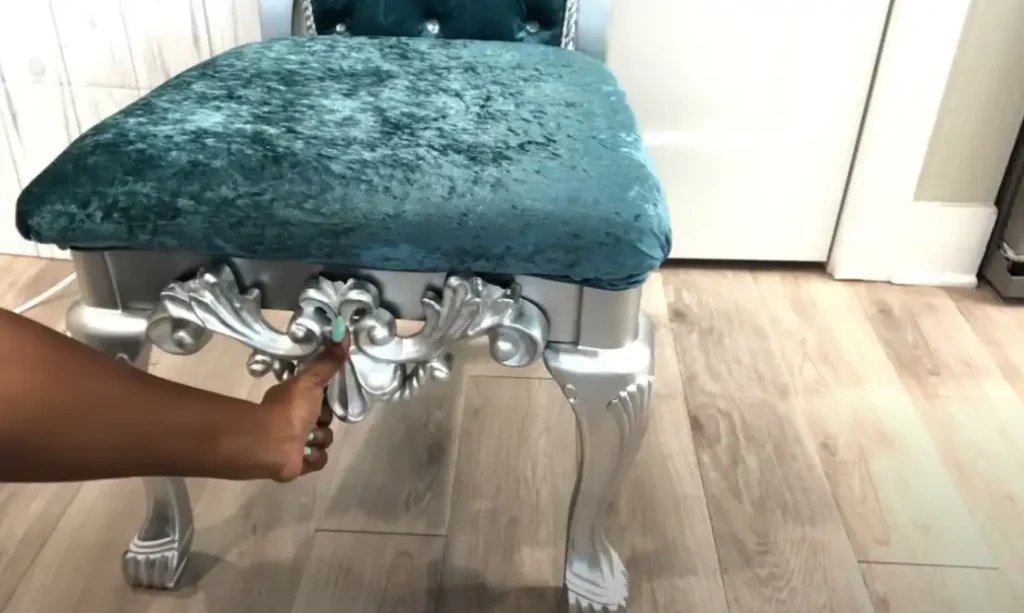
Now it’s time to unleash your creativity and add decorative trimmings and embellishments. Consider using golden braids, intricate lace, or sparkling rhinestones to enhance the royal appeal of your throne chair. Let your style guide you as you create a one-of-a-kind masterpiece fit for royalty.
6. Durability and Stability:
To ensure the longevity of your DIY throne chair, it’s important to pay attention to its durability and stability. Double-check that all the screws are tightened properly and that the structure is solid. Consider adding additional support beams or brackets if needed. This will prevent any wobbling or potential accidents, allowing you to enjoy your regal creation for years to come.
7. Upholstery Care:
Maintaining the upholstery is essential to keep your throne chair looking pristine. Regularly vacuum or use a soft brush to remove any dust or debris that may accumulate. In case of spills or stains, address them promptly by gently blotting the affected area with a clean cloth and mild upholstery cleaner. Avoid using harsh chemicals or abrasive materials that could damage the fabric or upholstery.
8. Showcase and Enjoy:
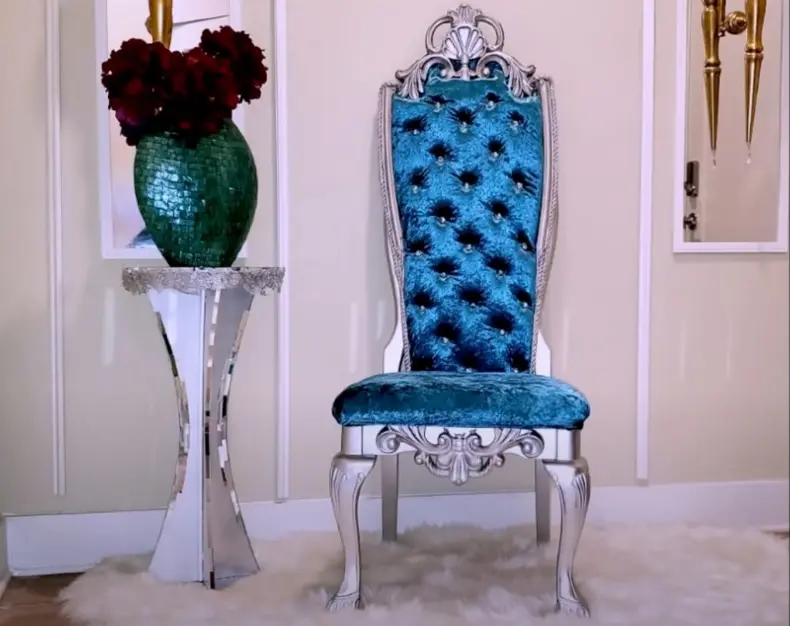
Once your DIY throne chair is complete, it’s time to find the perfect spot to showcase its magnificence. Consider placing it in your living room as a statement piece or create a dedicated corner where you can relax and immerse yourself in regal splendor. Invite friends and family to marvel at your creation and enjoy the luxurious seating experience it provides.
Credit – yoduvh Essentials
Additional Inspiration for Your DIY Throne Chair:
1. Customized Cushions:
Consider creating custom cushions to add an extra layer of comfort and visual appeal to your throne chair. Choose luxurious fabrics, such as velvet or silk, and select patterns or colors that complement the overall design of your chair. Mix and match different textures and styles for a truly personalized touch.
2. Embroidered Monograms:
Consider adding embroidered monograms to your throne chair for a truly personalized and regal touch. Use metallic threads or richly colored threads to create initials or decorative motifs. This adds a touch of exclusivity and elevates the chair’s status as a unique piece of furniture.
3. Canopy or Drapes:
For an even more glorious look, you can incorporate a canopy or drapes into the design of your throne chair. Use sheer or flowing fabrics like tulle or organza to create an ethereal and romantic ambiance. Hang the canopy from the top of the chair or drape the fabric elegantly along the backrest, giving your throne chair an enchanting and majestic feel.
4. Throne Chair for Special Occasions:
Your DIY throne chair can also be a captivating prop for special occasions. Whether it’s a themed party, a photo shoot, or a wedding, your regal creation will undoubtedly make a memorable impact. Consider decorating the chair with flowers, ribbons, or other festive ornaments to enhance the celebratory atmosphere.
5. Miniature Throne Chair:
Suppose you want to extend the royal theme throughout your home. Why not create a miniature version of the throne chair as a decorative accent? This smaller version can be placed on shelves and mantels or used as a unique centerpiece for special occasions. Let your imagination run wild as you design and craft a mini throne chair that complements the aesthetic of your home.
With these additional inspirations, you can further personalize and enhance the grandeur of your DIY throne chair. Feel free to experiment and adapt the design to suit your preferences and the specific ambiance you want to create.
FAQs (Frequently Asked Questions):
Q: Is this project suitable for beginners?
A: While some basic woodworking and upholstery skills are helpful, this project can be accomplished by beginners with patience and attention to detail. Take your time, follow the steps, and enjoy the process!
Q: Where can I find the materials required for this project?
A: You can find most of the materials needed at your local home improvement store, upholstery shop, or online retailers specializing in crafting supplies.
Q: Can I customize the size and shape of the throne chair?
A: Absolutely! Feel free to adjust the dimensions and modify the design to suit your preferences and available space. Just ensure that the chair remains stable and comfortable.
Q: How long does it take to complete the DIY throne chair?
A: The time required depends on your skill level, the complexity of the design, and the drying time for paint and glue. On average, this project may take a few days to a week to complete.
Q: Can I incorporate additional features into my DIY throne chair?
A: Absolutely! Suppose you want to take your throne chair to the next level. In that case, you can explore options such as built-in LED lights, hidden compartments, or even integrating speakers for a truly immersive experience. However, remember that these additions may require additional skills and expertise.
Q: Can I use alternative materials instead of wood for the base?
A: Certainly! While wood is famous for its sturdiness and versatility, you can experiment with other materials, such as metal, or even repurpose an existing chair by giving it a regal makeover. Ensure that the chosen material supports the weight and provides the desired aesthetic appeal.
Q: Are there any safety considerations when building a DIY throne chair?
A: Safety should always be a priority. When working with tools and materials, wear appropriate protective gear, such as gloves and goggles. Follow the manufacturer’s instructions for any products you use, and exercise caution throughout construction. If you need clarification on a particular step, consult a professional or seek guidance from experienced DIY enthusiasts.
Conclusion:
Congratulations on successfully creating your own DIY throne chair! You have transformed a simple wooden chair into a regal masterpiece that exudes elegance and charm. This project has allowed you to unleash your creativity, learn new skills, and bring a touch of royalty into your home.
Remember to maintain your throne chair’s durability and stability by regularly inspecting and tightening any screws or bolts. Take care of the upholstery to ensure its longevity and pristine appearance. By following these maintenance tips, you can continue enjoying the splendor of your DIY throne chair for years to come.
The possibilities are endless now that you have acquired the knowledge and skills to create a DIY throne chair. Consider making additional chairs to create a royal seating arrangement for a grand occasion. Share your newfound expertise with others who your creation may inspire.
So, go forth and conquer the world of DIY craftsmanship, one throne chair at a time. Unleash your inner king or queen and continue to explore the boundless possibilities of creating majestic furniture that leaves a lasting impression.


